Sikuli is an open-source tool that allows test automation using screenshots and image recognition. It is particularly useful for automating GUI-based applications.
Before installing Sikuli, there are a few things you should take care of to ensure a smooth installation and usage experience:
System Requirements
Make sure your system meets the minimum requirements to run Sikuli. Check the official Sikuli website or documentation for the specific requirements, such as the operating system version, Java version, Python version, etc.
Java Installation
Sikuli requires Java to run. Ensure you have Java installed on your system and that the correct version is available. Sikuli might have specific requirements for the Java version, so verify the compatibility.
Python Installation
Sikuli Script is based on Python, so you need to have Python installed on your system. Check the Sikuli documentation for the compatible Python version and ensure it is properly set up.
Sikuli Version
Decide which version of Sikuli you want to install. Choose the version that best suits your needs.
Download from Official Source
Always download Sikuli from the official website or trusted sources to avoid potential security risks or malware. The official Sikuli website is https://sikulix.com/.
Antivirus/Firewall
Disable your antivirus or firewall temporarily during the installation process. Some security software may interfere with the installation or block certain components, causing issues with Sikuli’s functioning.
Permissions
Ensure that you have the necessary permissions to install software on your system. If you are on a company-owned computer, you may need to contact your IT department for installation privileges.
Check for Updates
After installing Sikuli, check for any updates or patches that may have been released. Regularly updating Sikuli ensures you have the latest features and bug fixes.
Documentation and Resources
Familiarize yourself with Sikuli’s official documentation, tutorials, and community resources. Understanding the tool’s capabilities and best practices will help you make the most of Sikuli for test automation.
Test Environment
Set up a test environment with the application you want to automate and ensure it is accessible during script development and testing.
Image Assets
Prepare the image assets (PNG files) that you will use for Sikuli automation. Capture the relevant UI elements from your application with clear and distinct images.
Anticipate Limitations
Sikuli relies on image recognition, and its effectiveness may vary based on factors like screen resolution, image quality, and UI changes. Be aware of Sikuli’s limitations and choose it for scenarios where it can provide the most value.
Taking care of these considerations will help you set up Sikuli successfully and start using it for test automation with confidence.
Sikuli Installation Steps
To get started with Sikuli for test automation, follow these steps:
1. Install Sikuli:
– Go to the SikuliX website: http://doc.sikuli.org/index.html
– Download the appropriate version of SikuliX for your operating system (Windows, macOS, or Linux).
– Follow the installation instructions provided on the SikuliX website.
2. Launch Sikuli IDE:
– Sikuli IDE is a graphical user interface that allows you to create and execute Sikuli scripts.
– Once Sikuli is installed, launch the Sikuli IDE.
3. Familiarize yourself with Sikuli IDE:
– Sikuli IDE consists of an editor where you can write Sikuli scripts, a screenshot area for capturing images, and a log area for viewing results.
– Take some time to explore the interface and understand its various components.
4. Create a New Sikuli Script:
– In the Sikuli IDE, create a new script by selecting “File” > “New” or pressing Ctrl+N (Cmd+N on macOS).
– This will open a new editor where you can start writing your Sikuli script.
5. Capture Images:
– To interact with elements on the screen, you need to capture images of those elements. Sikuli uses these images for identification.
– Use the “Capture” button in the Sikuli IDE to take screenshots of the UI elements you want to interact with.
6. Write Sikuli Script:
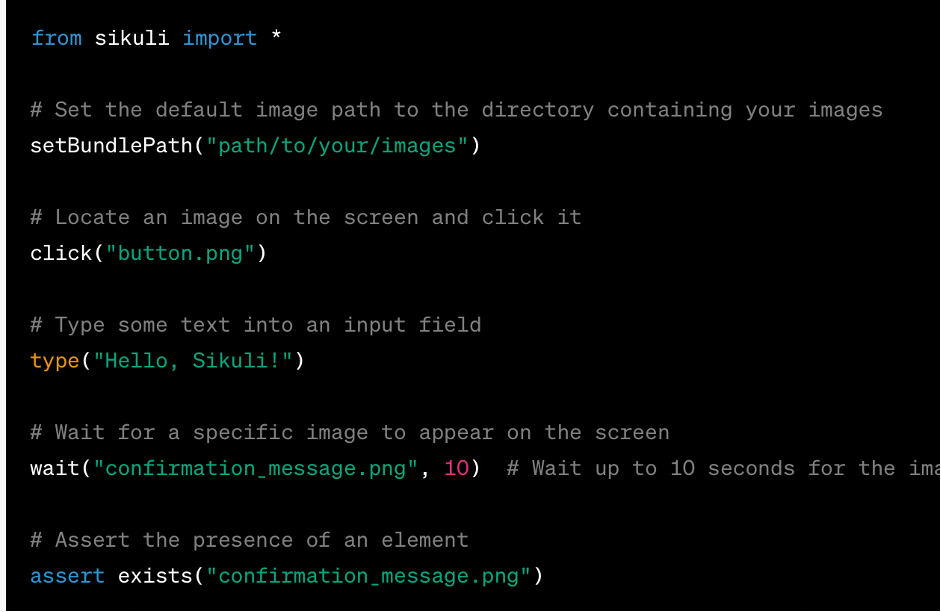
– In the Sikuli IDE editor, you can write Sikuli script commands using Python.
– Sikuli uses image recognition to identify and interact with elements on the screen.
For example:
 7. Run the Sikuli Script:
– Save your Sikuli script with a. Sikuli extension.
– Click on the “Run” button in the Sikuli IDE to execute the script.
– Sikuli will attempt to find the captured images on the screen and perform the specified actions.
8. Debugging and Refining:
– If your script encounters issues, use the Sikuli IDE’s log area and error messages to identify and fix the problems.
– Adjust image captures or add more robust image recognition to improve script reliability.
9. Integrate with Testing Framework (Optional):
– Sikuli can be integrated with popular testing frameworks like JUnit or TestNG for more structured test automation.
– You can also combine Sikuli with other automation tools to test different aspects of your application.
Experiment with Sikuli, explore its capabilities, and consider it as a valuable addition to your test automation toolbox for GUI-based applications.
Sikuli offers cross-platform image-based automation, making it user-friendly and accessible for testers and developers. Its visual approach allows for rapid test automation without the need for extensive programming knowledge, and it excels in handling dynamic UI changes, ensuring robust and adaptable automation scripts.


